快速开始
目标
- 创建一个 WPF 项目,并引入 Caliburn.Micro
- 修改程序结构,以 CM[1]的方式启动程序
- 通过 MVVM 的模式,绑定 ViewModel 的数据到 View 的控件上
- 创建容器,学习 CM 的 IoC 容器的使用方式
构建项目
创建 WPF 解决方案
使用.Net 5.0,.Net Framework 4.6.2,.NetCoreApp 3.1[2] 以上框架[3],这次使用 Windows 平台开发,所以使用.Net Framework 4.6.2。
引入 CM
在我们将项目适配为 Caliburn.Micro 项目之前,需要安装 Caliburn.Micro Nuget 包。在 Nuget 中搜索 Caliburn.Micro 安装即可
创建 MVVM 文件夹
准备项目的最后一步是在项目中创建三个文件夹。确保完全按照说明命名它们。CM 使用命名约定,使其能够自动搜索这些文件夹。
- Models
- Views
- ViewModels
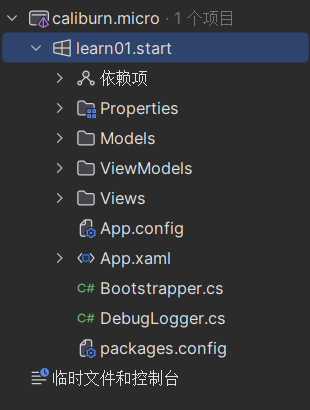
这个文件列表中有一些其他东西接下来会介绍
创建 ShellViewModel
创建一个名为 ShellViewModel 的类在 ViewModels 文件夹中。然后创建一个类 public 并让它继承自 Conductor<object>,Conductor<object> 是 Caliburn.Micro 与 ViewModel 交互的方式之一。
public class ShellViewModel : Conductor<object> {

}
在 CM 框架中,ViewModel 继承自 Conductor<T> 是一种常见的做法,这是为了让 ViewModel 能够管理其所包含的子 ViewModel。Conductor<T> 是一个用于管理子 ViewModel 的抽象类,它提供了一些方法来激活、关闭和处理子 ViewModel。
当 ViewModel 继承自 Conductor<object> 时,它就具有了管理子 ViewModel 的能力,可以通过调用 Conductor<T> 提供的方法来控制其包含的子 ViewModel 的生命周期。这种方式使得 ViewModel 之间可以建立父子关系,使得整个应用程序的 ViewModel 层次结构更加清晰和有序。
另外,由于 Conductor<T> 是一个泛型类,因此你可以根据需要指定不同类型的子 ViewModel。在一些情况下,可能会有一组不同类型的子 ViewModel 需要被管理,这时你可以将 ViewModel 继承自 Conductor<object>,然后通过泛型参数来指定具体的子 ViewModel 类型。
创建 ShellView
由于我们已经创建了一个类 ShellViewModel,因此我们还需要一个名为 ShellView 的 WPF Window ,在 Views 文件夹中创建一个新的 WPF Window 类。
尽管尚未使用,但此时添加一个 ContentControl 到 ShellView。
<ContentControl x:Name="ActiveItem" Margin="20"/>您应该确保在这里使用名称 ActiveItem,因为这是 Caliburn.Micro 命名约定。稍后将使用此名称来定位应显示用户控件的位置。
删除 MainWindow.xaml
最后一步是删除 MainWindow.xaml,我们想要在启动时使用 ShellView 作为主窗口,那么在创建 WPF 项目时生成的 MainWindow.xaml 已经没什么用了,为了不干扰程序结构,所以可以将它删除。
创建 Bootstrapper 类
在根目录创建 Bootstrapper.cs,确保它是 public 并继承自 Bootstrapperbase。创建后,需要添加许多方法。首先添加一个调用 Initialize() 方法的构造函数,然后重写了 OnStartup 来告诉 Bootstrapper 启动 ShellViewModel。同时这里还是使用异步的方法,它使应用程序响应更快。
public class Bootstrapper : BootstrapperBase {
	public Bootstrapper() {
	    Initialize();
	}

	protected override async void OnStartup(object sender, StartupEventArgs e) {
	    await DisplayRootViewForAsync(typeof(ShellViewModel));
	}
}
修改 App.xaml
在 App.xaml 文件中,有这一行 StartupUri="MainWindow.xaml"。这行代码使 MainWindow.xaml 成为启动应用程序时显示的窗口。因为上面步骤将启动程序显示窗口交给了 Bootstrapper 负责了,所以需要删除这一部分。
同时需要将 Bootstrapper 作为资源加载到 App.xaml 中,最后的代码应该如下所示
<Application x:Class="xxxxx.App"
             xmlns="http://schemas.microsoft.com/winfx/2006/xaml/presentation"
             xmlns:x="http://schemas.microsoft.com/winfx/2006/xaml"
             xmlns:local="clr-namespace:xxxxx">
    <Application.Resources>
      <ResourceDictionary>
           <ResourceDictionary.MergedDictionaries>
               <ResourceDictionary>
                   <local:Bootstrapper x:Key="Bootstrapper" />
               </ResourceDictionary>
             </ResourceDictionary.MergedDictionaries>
       </ResourceDictionary>
    </Application.Resources>
</Application>
具体来说,当应用程序启动时,WPF 框架会检查应用程序资源字典中的内容,并执行其中的操作。在这种情况下,由于 Bootstrapper 被添加为资源,WPF 会实例化 Bootstrapper 类,并调用其构造函数和其他初始化方法。
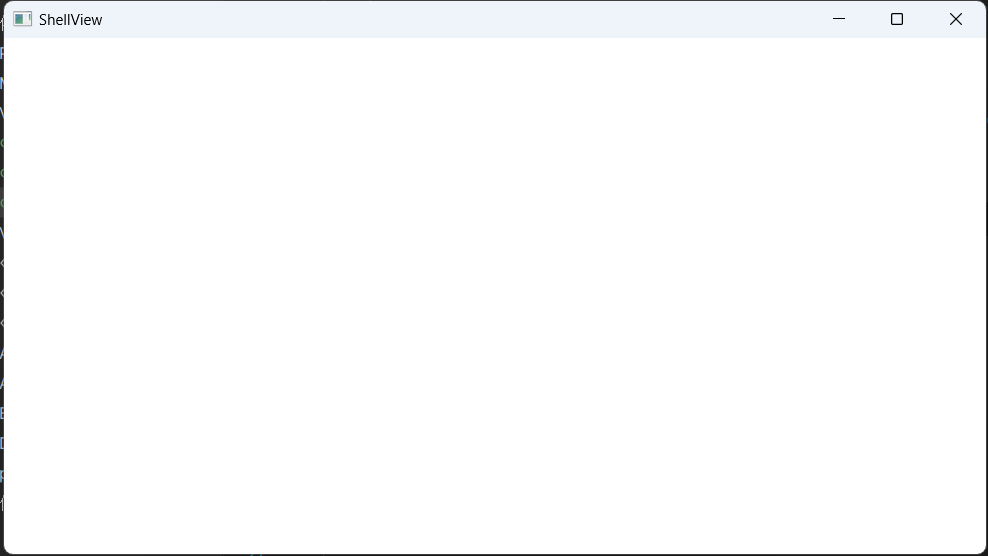
启动应用程序
此时编译并调试应用程序,它已经能够正常启动了,可以看到他创建了一个窗口,和原本的未使用 CM 框架时一样,但是现在它显示的是我们指定的 ShellView,而不是原来的 MainWindow。
简单的日志记录
在 CM 中,使用了 LogManager 静态类来管理调试时显示的日志
public static class LogManager
{
    private static readonly ILog NullLogInstance = new NullLog();

    /// <summary>
	/// Creates an <see cref="ILog"/> for the provided type.
	/// </summary>
	public static Func<Type, ILog> GetLog = type => NullLogInstance;

    private class NullLog : ILog
    {
        public void Info(string format, params object[] args) { }
        public void Warn(string format, params object[] args) { }
        public void Error(Exception exception) { }
    }
}
源码中定义了一个名为 GetLog 的静态变量,它是一个 Func<Type, ILog> 委托类型的变量,意味着它是一个接受一个 Type 类型参数并返回 ILog 接口类型的函数。而其中 NullLogInstance 是一个实现了 ILog 接口的实例,但是并不做任何操作。
我们可以手动实现一个 ILog 类型的对象,并在 Bootstrapper 的任何地方[4],将 LogManager 中的 GetLog 修改为自己新建的 Log 类。如下例子所示
public class DebugLogger : ILog {
    private readonly Type type;

    public DebugLogger(Type type) {
        this.type = type;
    }

    public void Info(string format, params object[] args) {
        if(format.StartsWith("No bindable"))
            return;
        if(format.StartsWith("Action Convention Not Applied"))
            return;
        Debug.WriteLine("INFO: " + format, args);
    }

    public void Warn(string format, params object[] args) {
        Debug.WriteLine("WARN: " + format, args);
    }

    public void Error(Exception exception) {
        Debug.WriteLine("ERROR: {0}\n{1}", type.Name, exception);
    }
}
这里手动实现了一个 DebugLogger 的类型,它实现了 Ilog 接口。然后在 Bootstrapper 的构造方法中加入修改 GetLog 的语句,如下所示。这样就可以使用自定义的 Logger 来显示日志了。
public Bootstrapper() {
    LogManager.GetLog = type => new DebugLogger(type);
    Initialize();
}
关于为什么要自定义 Logger,这是 CM 框架提供了一个方便我们调试代码的手段,如下所示,在 Debug 的过程中,一些动作属性更新等等均会记录到 Logger 中,这使得我们能够更清楚的知道程序中发生了什么,以便于更好的定位问题。
INFO: Action: Edit availability update.
INFO: Action: Edit availability update.
INFO: Action: Delete availability update.
INFO: Action: Delete availability update.
INFO: Action: Save availability update.
INFO: Action: Save availability update.
INFO: Action: Clear availability update.
INFO: Action: Clear availability update.
INFO: Action: Edit availability update.
INFO: Action: Delete availability update.
构建自定义页面
创建一个 Model
在 Model 文件夹中创建一个 CategoryModel 类
public class CategoryModel {
    public string CategoryName { get; set; }
    public string CategoryDescription { get; set; }
}
创建一个 ViewModel
在 ViewModel 中创建一个 CategoryViewModel 类
public class CategoryViewModel : Screen {
    private BindableCollection<CategoryModel> categoryList = new BindableCollection<CategoryModel>();
    private CategoryModel selectedCategory;
    private string categoryName;
    private string categoryDescription;

    public BindableCollection<CategoryModel> CategoryList {
        get { return categoryList; }
        set { categoryList = value; }
    }

    public CategoryModel SelectedCategory {
        get { return selectedCategory; }
        set {
            selectedCategory = value;
            NotifyOfPropertyChange(() => SelectedCategory);
            NotifyOfPropertyChange(() => CanEdit);
            NotifyOfPropertyChange(() => CanDelete);
        }
    }

    public string CategoryName {
        get { return categoryName; }
        set {
            categoryName = value;
            NotifyOfPropertyChange(() => CategoryName);
            NotifyOfPropertyChange(() => CanSave);
        }
    }

    public string CategoryDescription {
        get { return categoryDescription; }
        set {
            categoryDescription = value;
            NotifyOfPropertyChange(() => CategoryDescription);
        }
    }

    protected override void OnViewLoaded(object view) {
        base.OnViewLoaded(view);
        if(CategoryList.Count == 0) {
            CategoryList.AddRange(new[] {
                new CategoryModel { CategoryName = "Meals", CategoryDescription = "Lunched and diners" },
                new CategoryModel
                    { CategoryName = "Representation", CategoryDescription = "Gifts for our customers" },
            });
        }
    }

    public bool CanEdit {
        get { return SelectedCategory != null; }
    }

    public void Edit() {
        CategoryName = SelectedCategory.CategoryName;
        CategoryDescription = SelectedCategory.CategoryDescription;
    }

    public void Delete() {
        CategoryList.Remove(SelectedCategory);
        Clear();
    }

    public bool CanDelete {
        get { return SelectedCategory != null; }
    }

    public void Save() {
        var newCategory = new CategoryModel {
            CategoryName = CategoryName,
            CategoryDescription = CategoryDescription
        };
        if(SelectedCategory != null) {
            CategoryList.Remove(SelectedCategory);
        }
        CategoryList.Add(newCategory);
        Clear();
    }

    public bool CanSave {
        get {
            return CategoryName?.Length > 2;
        }
    }

    public void Clear() {
        CategoryName = string.Empty;
        CategoryDescription = string.Empty;
        SelectedCategory = null;
    }
}
这段代码展示了一个名为 CategoryViewModel 的类,它继承自 Screen 类,这是 Caliburn.Micro 框架提供的一个基类,用于表示屏幕的概念,通常在 WPF 应用程序中代表一个界面或视图。
这个 CategoryViewModel 类包含了一些属性和方法,用于管理"类别"对象的操作和状态。以下是主要部分的解释:
- 属性:
CategoryList:一个BindableCollection<CategoryModel>类型的属性,用于存储类别对象的集合。SelectedCategory:表示当前选中的类别对象。CategoryName和CategoryDescription:分别表示类别的名称和描述。- 这些属性的
set方法中有NotifyOfPropertyChange这个负责通知那个属性发生了变化
- 方法:
OnViewLoaded(object view):重写了OnViewLoaded方法,当视图加载时会执行该方法,用于初始化CategoryList属性。Edit():用于编辑选中的类别对象,将其属性值赋给对应的属性。Delete():用于删除选中的类别对象。Save():用于保存或更新类别对象。Clear():用于清除当前的类别属性,以便添加新的类别对象。
- CanXXX 属性:
CanEdit、CanDelete、CanSave:这些布尔类型的属性用于控制用户是否可以执行编辑、删除、保存操作。根据不同的条件,它们会返回true或false。
BindableCollection 说明
BindableCollection 是 Caliburn.Micro 框架提供的一个特殊的集合类,它实现了 INotifyCollectionChanged 和 INotifyPropertyChanged 接口,用于在集合发生变化时通知界面进行更新。
BindableCollection 的作用主要有以下几点:
- 支持数据绑定:
BindableCollection实现了INotifyCollectionChanged接口,这意味着当集合中的元素增加、删除、移动或清除时,界面会自动更新以反映这些变化。 - 支持属性变化通知:
BindableCollection还实现了INotifyPropertyChanged接口,这意味着当集合本身的属性发生变化时(例如 Count 属性),界面也会自动更新。 - 方便在界面上使用:由于
BindableCollection是为了在界面上进行数据绑定而设计的,因此它在使用上更加方便。你可以直接将BindableCollection对象绑定到界面上的控件(如ListBox、DataGrid等),而无需手动处理数据变化时的更新逻辑。
相较于 ObservableCollection 他有一下几点不同:
- 命名空间:
BindableCollection属于 Caliburn.Micro 框架。ObservableCollection属于.NET Framework 中的System.Collections.ObjectModel命名空间。
- 功能差异:
BindableCollection实现了INotifyCollectionChanged和INotifyPropertyChanged接口,用于在集合发生变化时通知界面进行更新。ObservableCollection只实现了INotifyCollectionChanged接口,用于在集合发生变化时通知界面进行更新。它没有实现INotifyPropertyChanged接口,因此在集合本身的属性发生变化时,界面不会自动更新。
- 可扩展性:
- 由于
BindableCollection实现了INotifyPropertyChanged接口,因此它具有更多的可扩展性,可以方便地监听集合本身属性的变化,从而实现更灵活的数据绑定。 ObservableCollection主要用于监听集合元素的变化,它的主要功能是在元素增加、删除、移动或清除时通知界面进行更新。
- 由于
- 依赖关系:
BindableCollection是 Caliburn.Micro 框架的一部分,因此在使用 Caliburn.Micro 框架时,通常会选择使用BindableCollection。ObservableCollection是.NET Framework 的一部分,因此在不使用 Caliburn.Micro 框架的情况下,通常会选择使用ObservableCollection。
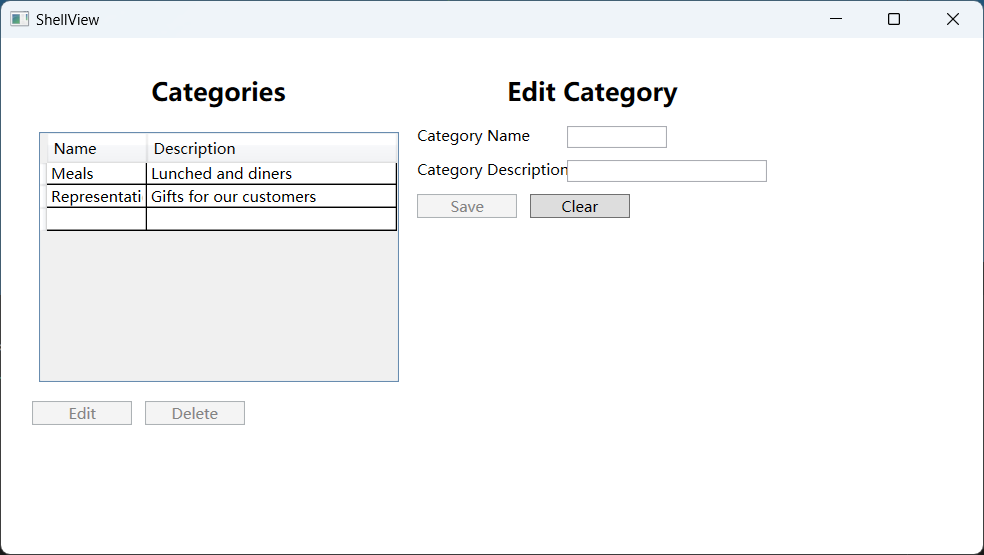
创建一个 View
在 View 文件夹中创建一个 UserControl,名字为 CategoryView。
<UserControl
    d:DataContext="{d:DesignInstance viewModels:CategoryViewModel}"
    d:DesignHeight="450"
    d:DesignWidth="800"
    mc:Ignorable="d"
    x:Class="learn01.start.Views.CategoryView"
    xmlns="http://schemas.microsoft.com/winfx/2006/xaml/presentation"
    xmlns:d="http://schemas.microsoft.com/expression/blend/2008"
    xmlns:local="clr-namespace:learn01.start.Views"
    xmlns:mc="http://schemas.openxmlformats.org/markup-compatibility/2006"
    xmlns:viewModels="clr-namespace:learn01.start.ViewModels"
    xmlns:x="http://schemas.microsoft.com/winfx/2006/xaml">
    <Grid>
        <Grid.ColumnDefinitions>
            <ColumnDefinition Width="auto" />
            <ColumnDefinition Width="auto" />
            <ColumnDefinition Width="auto" />
            <ColumnDefinition Width="*" />
        </Grid.ColumnDefinitions>
        <StackPanel Grid.Column="0">
            <TextBlock FontSize="20" FontWeight="Bold" HorizontalAlignment="Center" Margin="10"> Categories
            </TextBlock>
            <DataGrid AutoGenerateColumns="False" Height="200" ItemsSource="{Binding CategoryList, NotifyOnSourceUpdated=True}" Margin="10" SelectedItem="{Binding SelectedCategory}">
                <DataGrid.Columns>
                    <DataGridTextColumn Binding="{Binding CategoryName}" Header="Name" IsReadOnly="True" Width="80" />
                    <DataGridTextColumn Binding="{Binding CategoryDescription}" Header="Description" IsReadOnly="True" Width="200" />
                </DataGrid.Columns>
            </DataGrid>
            <WrapPanel>
                <Button Margin="5" Width="80" x:Name="Edit"> Edit </Button>
                <Button Margin="5" Width="80" x:Name="Delete"> Delete </Button>
            </WrapPanel>
        </StackPanel>
        <StackPanel Grid.Column="1">
            <TextBlock FontSize="20" FontWeight="Bold" HorizontalAlignment="Center" Margin="10"> Edit Cat </TextBlock>
            <WrapPanel Margin="5">
                <TextBlock Width="120">Category Name</TextBlock>
                <TextBox Text="{Binding CategoryName, Mode=TwoWay, UpdateSourceTrigger=PropertyChanged}" Width="80" x:Name="CategoryName" />
            </WrapPanel>
            <WrapPanel Margin="5">
                <TextBlock Width="120">Category Description</TextBlock>
                <TextBox Text="{Binding CategoryDescription, Mode=TwoWay}" Width="160" x:Name="CategoryDescription" />
            </WrapPanel>
            <WrapPanel>
                <Button Margin="5" Width="80" x:Name="Save"> Save </Button>
                <Button Margin="5" Width="80" x:Name="Clear"> Clear </Button>
            </WrapPanel>
        </StackPanel>
    </Grid>
</UserControl>
这里使用了 Binding 来将 View 控件 和 ViewModel 中的属性绑定到一起,CM 框架在启动时会处理这两个类中的数据关系,我们不需要考虑其中的细节,但是为了使这种关联关系正常执行,请遵循 CM 的命名规则[5]。
在 Shell 中关联 CategoryViewModel
为了主窗口能够加载我们自己定义的控件,首先需要在 ShellViewModel 中添加一个函数
public Task EditCategories() {
    var viewmodel = IoC.Get<CategoryViewModel>();
    return ActivateItemAsync(viewmodel, new CancellationToken());
}
这是从 IoC 容器中拿到一个 CategoryViewModel 类型的实例,并将其绑定到 ShellView 中名为 ActiveItem 的 ContentControl 中。
然后在 ShellViewModel 加载时,执行这个函数
protected override async void OnViewLoaded(object view) {
    base.OnViewLoaded(view);
    await EditCategories();
}
启动应用程序
编译并调试这个程序,我们便能看到如下图所示的一个基本程序,如此便完成自定义页面的设计与显示。
自定义 IoC 容器
什么是依赖注入容器
依赖注入容器(Dependency Injection Container)是一种软件设计模式,用于管理应用程序中对象之间的依赖关系。它负责创建、解析和注入对象之间的依赖关系,以帮助实现松耦合和可测试性。
依赖注入容器通常具有以下功能:
- 对象创建:容器负责根据指定的配置和类型信息来创建对象。这些对象可以是应用程序的服务、组件或其他对象。
- 依赖解析:容器能够识别并解析对象之间的依赖关系。当一个对象需要依赖其他对象时,容器会自动将依赖项注入到该对象中。
- 生命周期管理:容器可以管理对象的生命周期,包括单例、瞬时、作用域等不同的生命周期模式。这有助于确保对象在应用程序中的正确使用和释放。
- 配置和管理:容器通常提供了一种机制来配置和管理对象的依赖关系,包括注册类型、设置参数、指定生命周期等。
依赖注入容器可以帮助简化应用程序的设计和开发过程,提高代码的可维护性和可测试性。
简单来讲,在编写程序的过程中,往往需要通过 new 关键字创建很多对象,如果项目过大这会导致很多混乱的事情发生,例如内存泄漏等等,通过一个容器来管理这些对象实例,往往是大型复杂项目的最佳实践,这需要有充足的设计模式知识来理解这个问题,建议多花些时间来系统性学习相关知识。
创建简单容器(SimpleContainer)
回到这个项目,我们需要在 Bootstrapper 中添加一个字段
private readonly SimpleContainer container = new SimpleContainer();然后重写 Configure 方法,来配置容器中的相关内容
protected override void Configure() {
    container.Instance(container);
    container
        .Singleton<IWindowManager, WindowManager>()
        .Singleton<IEventAggregator, EventAggregator>();

    foreach(var assembly in SelectAssemblies()) {
        assembly.GetTypes()
                .Where(type => type.IsClass)
                .Where(type => type.Name.EndsWith("ViewModel"))
                .ToList()
                .ForEach(viewModelType => container.RegisterPerRequest(
                    viewModelType, viewModelType.ToString(), viewModelType));
    }
}container.Instance(container);将容器实例自身注册到了自身;container.Singleton<IWindowManager, WindowManager>()和container.Singleton<IEventAggregator, EventAggregator>();将 IWindowManager 和 IEventAggregator 接口分别注册到了对应的实现 WindowManager 和 EventAggregator 中,并且声明为单例模式(Singleton)。这意味着当应用程序需要这些服务时,将始终使用同一实例。- 在遍历所有预选程序集(SelectAssemblies())。对于每个程序集中的每个类类型(type.IsClass),如果类名以 "ViewModel" 结尾,会将它们注册为按需请求的类型(RegisterPerRequest)。这种注册方式表示每次请求都会创建新的实例,对于 MVVM 架构中的 ViewModel 类来说,这通常是需要的。
最后需要添加一些方法来设置一些内容,但是这不是现在需要关心的。
protected override object GetInstance(Type service, string key) {
    return container.GetInstance(service, key);
}

protected override IEnumerable<object> GetAllInstances(Type service) {
    return container.GetAllInstances(service);
}

protected override void BuildUp(object instance) {
    container.BuildUp(instance);
}
使用容器中的 WindowManager
接下来通过一个实例来说明如何使用 IoC 容器
创建菜单组件
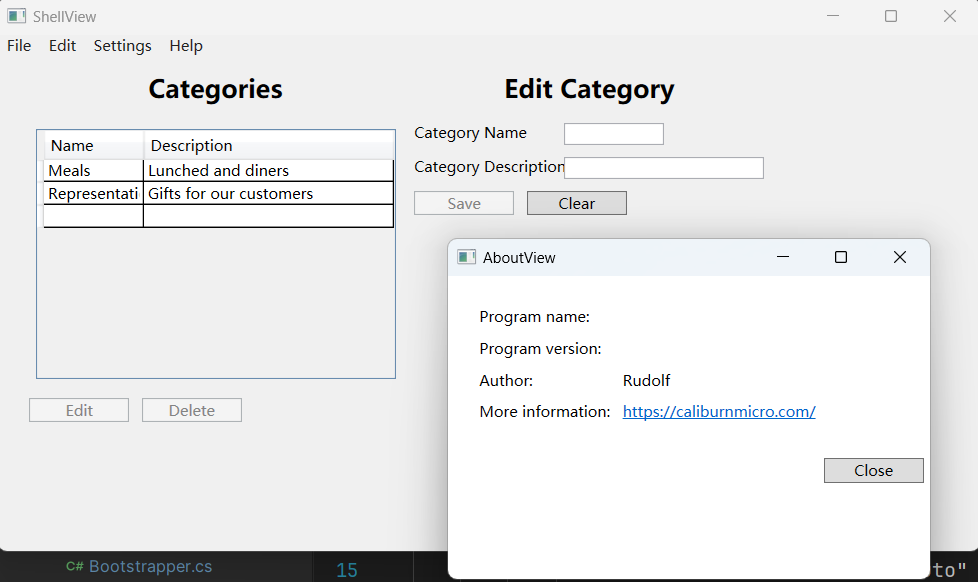
在 ShellView.xaml 中添加以下代码
<Menu>
    <MenuItem
        Header="File"
        IsEnabled="{Binding CanFileMenu}"
        x:Name="FileMenu" />
    <MenuItem Header="Edit" />
    <MenuItem Header="Settings">
        <MenuItem Header="Edit Categories" x:Name="EditCategories" />
    </MenuItem>
    <MenuItem Header="Help">
        <MenuItem Header="Manual" />
        <MenuItem Header="About" x:Name="About" />
    </MenuItem>
</Menu>
与 Button 不同,MenuItem 无法通过类似 CanXXX 来控制是否执行,所以可以通过 Binding 的方式,将 ViewModel 中的属性绑定到 IsEnabled 上面进行控制。
创建 About 相关的 Model、View、ViewModel
AboutModel:
public class AboutModel {
    public string Title { get; set; } = "Caliburn.Micro Tutorial";
    public string Version { get; set; } = "1.0";
    public string Author { get; set; } = "Rudolf";
    public string Url { get; set; } = "https://caliburnmicro.com/";
}AboutViewModel:
public class AboutViewModel:Screen {

    public AboutModel AboutData { get; } = new AboutModel();

    public Task CloseForm()
    {
        return TryCloseAsync();
    }
}AboutViewModel:
<Window
    Height="450"
    Title="AboutView"
    Width="800"
    mc:Ignorable="d"
    x:Class="learn01.start.Views.AboutView"
    xmlns="http://schemas.microsoft.com/winfx/2006/xaml/presentation"
    xmlns:d="http://schemas.microsoft.com/expression/blend/2008"
    xmlns:local="clr-namespace:learn01.start.Views"
    xmlns:mc="http://schemas.openxmlformats.org/markup-compatibility/2006"
    xmlns:x="http://schemas.microsoft.com/winfx/2006/xaml">
    <StackPanel>
        <Grid Margin="20">
            <Grid.ColumnDefinitions>
                <ColumnDefinition Width="Auto" />
                <ColumnDefinition MinWidth="150" Width="Auto" />
                <ColumnDefinition Width="*" />
            </Grid.ColumnDefinitions>
            <Grid.RowDefinitions>
                <RowDefinition Height="Auto" />
                <RowDefinition Height="Auto" />
                <RowDefinition Height="Auto" />
                <RowDefinition Height="Auto" />
                <RowDefinition Height="*" />
            </Grid.RowDefinitions>
            <TextBlock Grid.Column="0" Grid.Row="0" Margin="5"> Program name: </TextBlock>
            <TextBlock Grid.Column="1" Grid.Row="0" Margin="5" x:Name="AboutDataTitle" />
            <TextBlock Grid.Column="0" Grid.Row="1" Margin="5"> Program version: </TextBlock>
            <TextBlock Grid.Column="1" Grid.Row="1" Margin="5" x:Name="AboutDataVersion" />
            <TextBlock Grid.Column="0" Grid.Row="2" Margin="5"> Author:
            </TextBlock>
            <TextBlock Grid.Column="1" Grid.Row="2" Margin="5" Text="{Binding AboutData.Author}" />
            <TextBlock Grid.Column="0" Grid.Row="3" Margin="5"> More information: </TextBlock>
            <TextBlock Grid.Column="1" Grid.Row="3" Margin="5">
                <Hyperlink NavigateUri="{Binding AboutData.Url}">
                    <TextBlock Text="{Binding AboutData.Url}" />
                </Hyperlink>
            </TextBlock>
        </Grid>

        <Button HorizontalAlignment="Right" Margin="5" Width="80" x:Name="CloseForm"> Close </Button>
    </StackPanel>
</Window>
配置窗口管理器
在 ShellViewModel 中添加一个字段
private readonly IWindowManager windowManager;并且调整构造函数导入接口 IWindowManager,之前创建的容器会自动处理这个构造函数。
public ShellViewModel(IWindowManager windowManager) {
    this.windowManager = windowManager;
}
创建一个与 MenuItem 中的 x:Name 同名的方法,这个方法将在 MenuItem 按下时被调用。
public Task About() {
    return windowManager.ShowDialogAsync(IoC.Get<AboutViewModel>());
}
ShowDialogAsync 会将视图模型显示为模式对话框形式。DialogResult 将返回为 bool?。如果您需要无模式表单,可以使用以下代码:
windowManager.ShowWindowAsync(IoC.Get<AboutViewModel>()); // 打开窗口
// or
windowManager.ShowPopupAsync(IoC.Get<AboutViewModel>()); // 跟随鼠标
具体的关于 ShowDialogAsync 的内容,可以去看一下源码,具体内容取决于代码运行的平台。
public virtual async Task<bool?> ShowDialogAsync(object rootModel, object context = null, IDictionary<string, object> settings = null)rootModel指的是ViewModel.context是指想要与 ViewModel 关联的 View。在大多数情况下 null 是一个很好的选择。CM 将为您施展魔法。settings允许插入窗口设置。一般来说窗口的配置还是在具体 View 中设置,除了一些特殊情况。
settings eg:
dynamic settings = new ExpandoObject();
settings.WindowStartupLocation = WindowStartupLocation.CenterOwner;
settings.ResizeMode = ResizeMode.NoResize; settings.MinWidth = 450;
settings.Title = "My New Window";
settings.Icon = new BitmapImage( new Uri( "pack://application:,,,/MyApplication;component/Assets/myicon.ico" ) );
IWindowManager manager = new WindowManager();
manager.ShowDialog( myViewModel, null, settings );
启动应用程序
编译并调试应用程序,可以看到原有窗体上面多了一个菜单,点击 Help > About,会弹出一个新的窗体,就是我们创建的 About 页面。